
Not what you were looking for? Search here.
Set Up Your Clickers
The Easiest: Use "On the Fly" (includes VIDEO)
Teacher Paced Mode
Student Paced Mode
Practice Mode
Challenge Board Game
SCORE-dash Game
Set Up Your Clickers
New "batteried" pad users, be sure you've done these steps: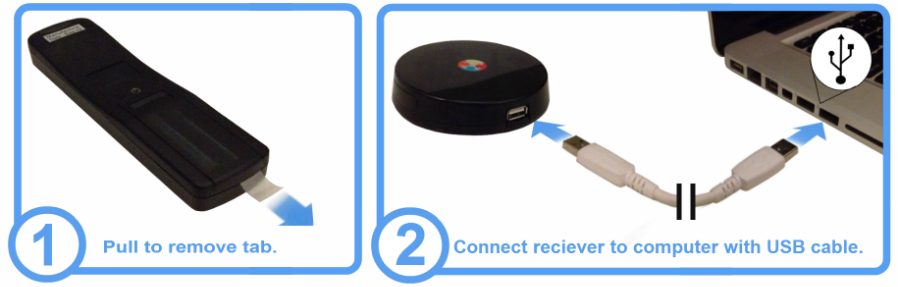
Touch-Screen Display Users: The touch-screen (touch panel) displays emit electromagnetic interference that can occasionally prevent some student responses (clicks) from registering. We recommend placing the receiver at least three feet from your touch panel in the student's direct line of sight.
eInstruction CPS Users Note: If eInstruction Device Manager or eInstruction Tools software is running, it might cause your receiver not to be detectable by ALL In Learning. It's easy to fix -- see this article for the solution.
Supported Response Systems:
Currently, ALL In Learning works with:
- ALL In Learning AIR IR, Long Life, and IR Eco Battery-Free
- Most eInstruction IR Pads (White with blue buttons, pads 1-50 only). (Must be fully functional as matching sets and not require special driver software. Unfortunately, ALL In Learning support isn't able to help with clickers from other companies that are not functioning.)
Note: Unfortunately, older ALL In Learning AIRrf (radiofrequency) clickers (recognizable by their small white buttons) can no longer be supported by current webhid technology.
Computer Requirements:
OS: Windows and Mac operating systems that can support current versions of Google Chrome
RAM: Operating system minimum plus 250MB
Connectivity: Internet Connection
Ports: USB Port
The Easiest: Use Clickers "On the Fly"
This video demonstrates several ways to use clickers "On the Fly" for awesome student engagement and formative assessment with little or no preparation:
Studies show that frequently checking for understanding and giving immediate feedback is the most effective strategy to produce academic gains.
How to Use Clickers On the Fly
- Log into your ALL In Learning account
- On the Home tab, click "Launch Clickers."
- If you are using clickers, select "Use with ALL In Response Pads" - even if you are ALSO using the Web Clickers feature for remote students. If you are ONLY using Web Clickers with NO hardware clicker pads, choose "Use Web Clickers."
- Enter a name in the Report Name field, and click the name of the class you want to use (you must have at least 1 class set up).
- Select Scan Receivers, click on your receiver's name in the list, and choose "Connect."
- The On-the-Fly Controls window will open. Click "Start Question."
-
The feedback grid will appear, and you will be able to see a box for each clicker number assigned for the class roster. Position this window where you and the students can see it. As students respond, the Vote Count will show how many students have responded and each student will get feedback from their numbered box. When the student inputs an answer or changes their answer, the pad number will blink dark blue to indicate their input was received, and then revert to white. If the student changes their answer, the number pad will blink dark blue before reverting back to white.
Teachers can monitor student progress and performance during clicker use with their mobile devices, planning intervention in real time while protecting student anonymity! See this article for more info.
- When you are through collecting responses for this question, click End Question.
- The Charting window will open. Click an answer choice in the "Set Correct" section. You'll see the correct answer indicated in green on the graph.
Students love seeing the class answer distribution - especially when you are checking if they understand a lesson you are teaching. This gets them invested and interested in understanding - it becomes a game for them and valuable intel for you! You can choose different types of charts at the top of the window for variety. - Click "Close" when finished with this window.
- Click "Start Question" again to ask more questions and repeat the above steps.
- When you are finished with your session, click "End Session."
- An alert will pop up asking if you're sure - clicking "OK" will trigger a report to be generated in your Reports Tab with all the questions you asked during the session in order.
NOTE: You can attach standards to the report very easily later to track standards mastery and coverage, by going to Reports>Actions>Edit Key & Standards!
Clickers with Teacher-Paced On-Screen Questions
It's easy in ALL In Learning to display questions on screen for use with clickers. This is ideal for testing with clickers or for posing a question in the middle of a slideshow. And, lessons in ALL In Learning can be used as shared assessments, with great aggregated reporting. Assessing students this way is green, it's fast, it gives you instant feedback, and it saves hours of grading time.
Creating Lessons/Assessments for On-Screen Display and Clicker Use
There are many ways to create a lesson with on-screen questions in ALL In Learning. You may already have the lesson shared with you. But if you will be creating the lesson, see the following articles for instructions:
Create a Custom Lesson/Assessment
Import PowerPoint (PPTX) Files
Using Clickers with On-Screen Prepared Lessons and Assessments
- Log into your ALL In Learning account.
- Click Lessons/Assessments > My Lessons.
- Next to your lesson, click Activate > Use ALL In Response > Teacher Paced.
- Choose the class (you must have at least 1 class set up).
- Select Scan Receivers, click on your receiver's name in the list, and choose "Connect."
- The lesson will open in "Presentation" mode for displaying to students.
- Before proceeding, you may want to click "Settings" and choose whether to show your class the correct answer or their cumulative score after each question. Click "Close" when you've got the settings you want.
- Now, click "Start Question," and tell your students to start responding.
The feedback grid at the bottom of the window shows a box for each clicker number assigned on the roster. When the student inputs an answer or changes their answer, the pad number will blink dark blue to indicate their input was received, and then revert to white. If students change their answer, the number pad will blink dark blue before reverting back to white. - When all students are finished responding, click "End Question."
Based on the settings you chose, a chart may pop up showing your class information about how they responded. After discussing the chart with your class, click Close on that charting window to proceed.
- To advance to the next question, use your keyboard's spacebar or right-arrow key, click anywhere on the slide, or use the controls in the Slideshow Control window, and repeat steps 7 and 8 above.
- When finished with your test, click "Close Session." An alert will pop up asking if you're sure - clicking "OK" will trigger a report to be generated in your Reports Tab with the same title as the lesson/assessment.
Clickers with Student-Paced Questions
Student-paced clickers allow students to use a hard copy of a test and answer questions with their clickers at their own pace.
For the teacher, this option allows for immediate grading and data, without having to worry about scanning bubble sheets.
- Log into your ALL In Learning Account, click on the Lessons / Assessments tab, choose My Lessons, and then click Activate > Use ALL In Learning Response > Student Paced.
- Unlike Teacher Paced, the questions will not be projected in front of the class. To use Student Paced, you'll need printed copies or another way students can individually access the questions. To print off the assessment from ALL In Learning, click on Actions>Print Questions or Actions>Export to Word, then print.
- Click on the class for which you would like to activate the assessment (you must have at least 1 class set up).
- You and your students should see a clip that shows the meaning of colors in the Student Paced interface. Click Close when ready to move on.
- Select Scan Receivers, click on your receiver's name in the list, and choose "Connect."
- You're ready to start! The top number is the device number which is assigned to a specific student. The bottom number is the question number the student is working on. When a student has given an answer, the top number will blink blue then revert to white. The student must select the same answer again to confirm. Once confirmed, the question number (the bottom number) will change to indicate the student is on the next question.
- You may hit "End Session" at any time, and a report from the student responses is instantly available to you on your Reports tab.
Clickers and Student Practice Mode
Activating a clicker session using Student Practice Mode allows for students to work through problems and questions at their own pace. Until the student clicks on the correct answer, the question won't proceed, which facilitates the student in mastering and learning the content on their own.
Once you have created an assessment, follow the steps below to activate a Student Practice Mode session.
Activate Student Practice Session
- On your Lessons / Assessments tab, for the Lesson you wish to activate with Student Practice Mode, choose Actions > Use ALL In Response > Student Practice Mode.
- Click on the Class for which you would like to activate the Student Practice Session (you must have at least 1 class set up).
- A chart of how Practice Mode works will display. You will have to close this chart before proceeding with Student Practice Session.
- Before you can proceed, select Scan Receivers, click on your receiver's name in the list, and choose "Connect."
- You're ready to begin! It is important for the student to remember that the top number is their device number and the bottom number the question number, and that the question will not move forward until a correct answer is received.
- When a student has given an answer, the top number will blink blue then revert to white.
- A Report is made once the Student Practice Session is ended. This report only records the first answer the student gave for each question. Although it is a practice session, scores are kept for the first answer given so you can check on your student mastery.
Challenge Boards are pre-built Jeopardy-like games with standards-linked questions meant to be displayed to your class and answered with Clickers or by students using our Web Clicker feature with their phone, tablet, Chromebook, or computer.
Challenge boards can be used with a "teams" roster (teams share a device) or with each student responding on their own device. They can be used for fun engagement or for serious review and evaluation. All responses are recorded in your reports tab for analysis and intervention.
See this article to learn about Challenge Boards>>
SCORE-dash Game is an individual or team clicker activity where each student or team is given a randomized question from the assessment. The student or team must answer the question correctly to move to the next one. This activity is perfect for our Flat Panel Interactives, which make all questions available on one screen.
See this article to learn about Flat Panel Interactives>>
Here are steps for the "SCORE-dash Game"
- Go to Lessons/Assessments>My Assessments and find the assessment you wish to use.
- Click Activate>Use ALL In Response>SCORE-dash Game.
- Select a class
- Select Scan Receivers, click on your receiver's name in the list, and choose "Connect."
- When you start the game, each team or individual will see a row of pad numbers with a random question number under each one.
- Students will need to find the corresponding question associated with the pad number and provide an answer to that question.
- If answered correctly, the individual or team gets a get a new question number. If answered incorrectly, the individual or team must try again, only moving forward when answering the question correctly.
- Once a individual or team has answered all their questions, both their pad number and their question number will turn blue to show they have finished.
- When you are ready, click End Session to create a report
Monitor Clicker and Web Clicker Data in Real Time
While Clickers and Web Clickers engage and assess students instantly, recording detailed response data in your reports, any data displayed for the class is anonymized to promote participation and eliminate the embarrassment factor.
The Private Data feature in ASSIST lets you see individual students' responses, performance, and progress on your mobile device, so you can intervene with individuals or plan immediate interventions while the session is still active.
See this article about the Private Data feature in ASSIST.>>
Additional keywords: infrared air response pads AIL Plug In radio frequency pads cps not working clicking